REVIEW · TOKYO
Chopstick Making Workshop in Ginza
Book on GetYourGuide →Operated by 銀座箸 · Bookable on GetYourGuide
In the heart of Ginza, you’ll craft a useful souvenir through real hands-on tool work and a surprisingly personal choice of 24 woods and two lengths. It’s a short workshop that turns a familiar table item into something you made with your own hands. The shop is also set up with English-speaking staff to help you keep moving and get the details right.
In This Review
- Yes, it takes real pressure.
- Key points you’ll care about
- Ginza Chopstick Making: Why This Workshop Feels Like a Tokyo Skill, Not a Toy
- Meeting in Ginza and Getting Set Up Fast
- Choosing Wood Like a Chef Chooses Ingredients
- The One-Hour Workflow: Plane, Shape, Sand, Oil
- Step 1: Planing for the main shape
- Step 2: Sanding tips and corners for comfort
- Step 3: Oil coating for a polished finish
- Optional Laser Engraving: Turning a Souvenir Into a Personal Object
- What You’re Actually Paying For (Value, Not Just Price)
- Who This Workshop Fits Best in Your Tokyo Plan
- Practical Tips for a Smoother Hour
- Should You Book Chopstick Making in Ginza?
- FAQ
- How long is the Chopstick Making Workshop in Ginza?
- Where is the meeting point?
- What does the $25 price include?
- Can I choose the type of wood and the chopstick length?
- Is engraving available, and how much does it cost?
- What languages can be used for engraving?
- Will I be able to take the chopsticks home the same day?
- Does the workshop have English-speaking staff?
- Is the workshop suitable for children or older adults?
- Is the workshop wheelchair accessible?
- Is there flexibility for booking and payment?
Yes, it takes real pressure.
This isn’t a light craft where everything is pre-done. Plan on a learning curve and some effort as you plane and shape the wood before you sand and finish.
Key points you’ll care about
- 24 types of wood plus 2 lengths so you can match the look and feel you want
- Hand planing and sanding with proper tools, not just painting or assembling
- Oil finish that gives your chopsticks a polished, usable surface
- Optional laser engraving for names or a favorite phrase
- English-speaking support so you’re not stuck guessing what to do
- Take-home the same day with your finished pair ready to use
You can also read our reviews of more tours and experiences in Tokyo

Ginza Chopstick Making: Why This Workshop Feels Like a Tokyo Skill, Not a Toy
I like workshops that give you a real result at the end, and this one does. You start with raw wood and end with a working pair of chopsticks you can use at your own dining table. In a city full of shopping, it’s a nice switch: you’re making something small, practical, and personal.
What makes it feel especially “Tokyo” is the focus on finishing. The workshop isn’t just about cutting to shape. You plan, smooth the tips and corners, then coat with oil, which is where the final feel comes from. That oil step is also why the end product looks and feels cared for instead of rushed.
The setting is in Ginza, so you’re close to the energy of central Tokyo, but the activity itself is calm and workshop-like. You’ll be surrounded by tools, wood options, and step-by-step guidance.
Meeting in Ginza and Getting Set Up Fast
The meeting point is 2-9-13 Ginza, Chuo-ku, Tokyo. Plan to arrive a few minutes early so you can get your bearings and start on time. In a one-hour class, those first minutes matter because the workshop schedule is tight by design.
Once you check in, the first big step is simple: you choose your wood and decide the length. After that, you move through the shaping workflow at your station while staff circulate and help with technique. Even when it’s busy, the process is structured so you’re not waiting around doing nothing.
If you’re worried about language, you should feel okay. Staff who can speak English assist, and instruction is also available in Japanese. That usually means you can ask questions and adjust your grip or pressure without feeling lost.
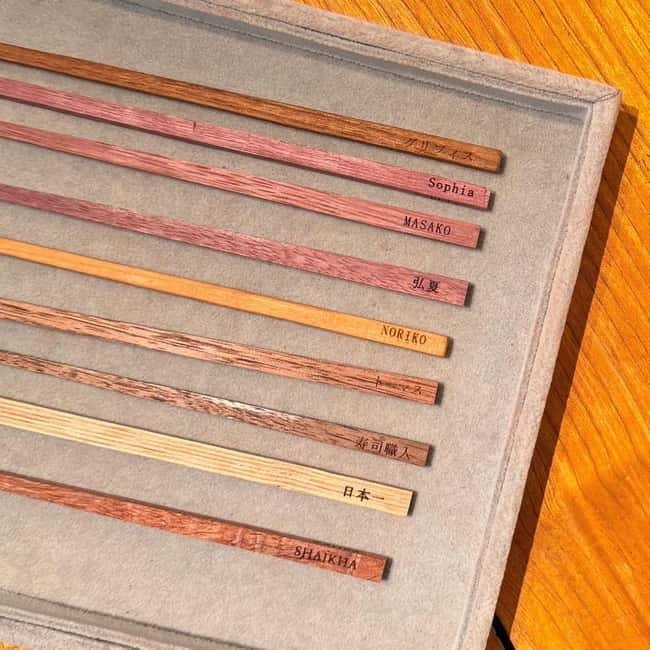
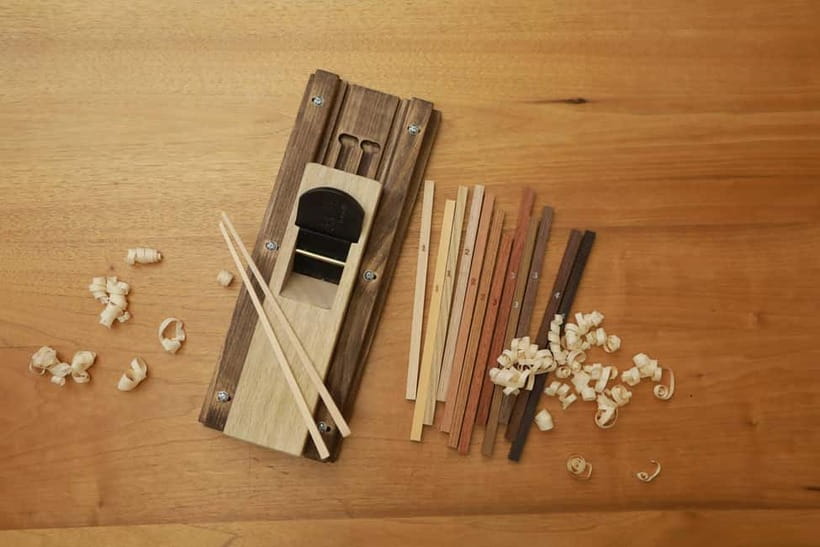
Choosing Wood Like a Chef Chooses Ingredients
One of the best parts is that you’re not forced into a single option. You can pick from 24 types of wood and two lengths for your chopsticks. The free-and-upgrade structure also pushes you to think about what you want the final pair to look and feel like.
Here’s how the pricing works for the wood choice:
- 5 wood types are free
- The remaining 19 wood types are higher grade and can cost extra
That matters because it turns the workshop into a more thoughtful souvenir choice. If you want a classic look, a free wood might be enough. If you’re chasing something with a different color tone or grain, upgrading is how you get that effect.
Two practical tips for choosing:
- If you’re doing this for a family keepsake, pick something that matches the vibe of the person receiving it. Light woods feel different from darker, richer tones once the oil hits.
- If you want the experience to stay stress-free, choose a wood you think you can shape steadily. Some woods can be harder to work with by hand, and you’ll feel it during planing.
The One-Hour Workflow: Plane, Shape, Sand, Oil
This is the core of the class: you’ll do the hands-on woodworking steps yourself, with instruction and support along the way. The pace is built for a one-hour session, so you’ll move from rough shaping to smooth finishing without the workshop dragging on.


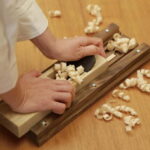
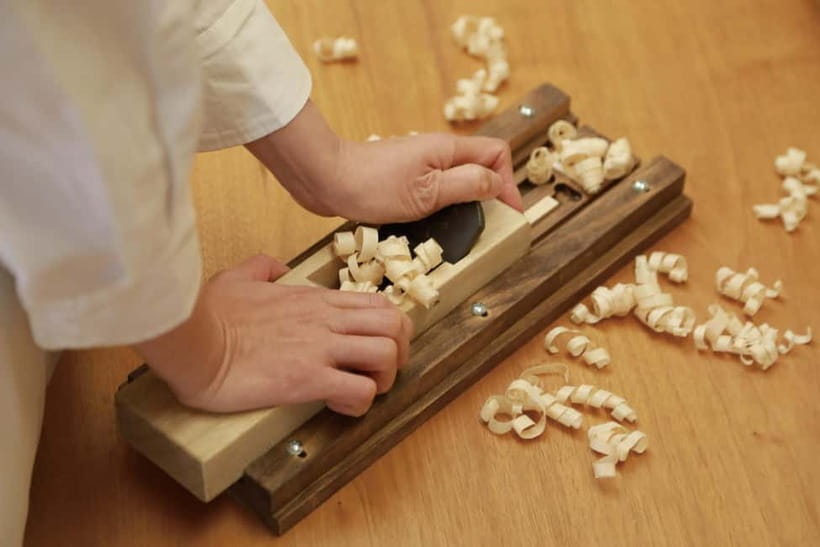
Step 1: Planing for the main shape
You place the chopsticks on the stand and use a plane to shape them. The plane step is where the “workshop” part becomes real. It takes a bit of strength and a steady motion to shave the wood evenly.
I like this stage because it gives quick feedback. You can see the form emerging fast, and staff help you correct technique before you waste time sanding away mistakes later.
Step 2: Sanding tips and corners for comfort
Next, you smooth the tips and corners with sandpaper. This is a big deal for real-world use. Chopsticks don’t just have to look good; they need to feel right when you pick them up and when they touch food.
The most common mistake here is rushing. Sanding is slower than planing, and it’s the stage where patience pays off. If you take your time, your final pair will feel more refined.
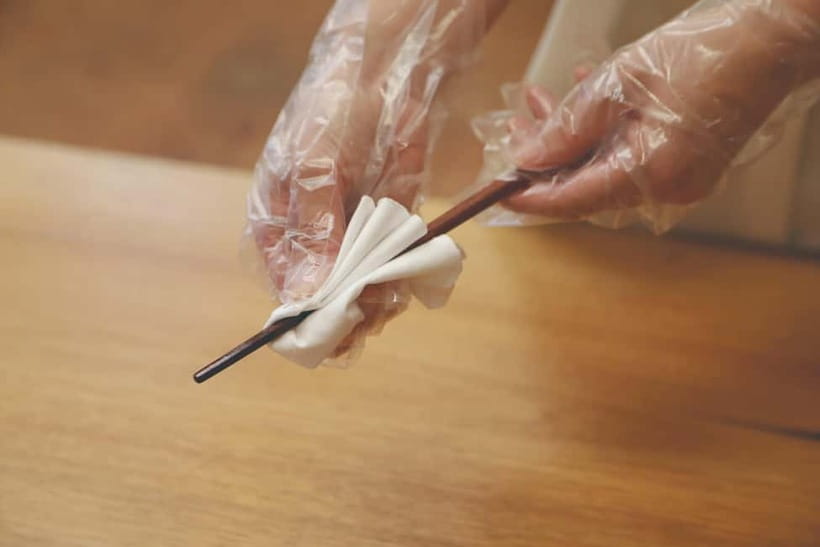
Step 3: Oil coating for a polished finish
After shaping and smoothing, you coat the chopsticks with oil. This is the step that makes the wood look finished instead of unfinished. It also helps give that warm, polished feel you’re expecting from a handmade product.
Once the oil step is complete, you can take the finished chopsticks home on the day. That same-day take-home matters. A lot of souvenirs feel like they belong in a drawer. These are designed for daily use.
Optional Laser Engraving: Turning a Souvenir Into a Personal Object
If you want your chopsticks to feel like yours, this is where you make the leap from craft project to keepsake.
You can have your name engraved, and the workshop offers the option to engrave your name or a favorite phrase. You can do it in Japanese or your native language, with help from the staff if you want it rendered in a more authentic Japanese style.
The engraving is done with a high-performance laser designed to put gentle stress on the wood. That’s a technical detail worth appreciating: laser engraving tends to be precise, and the point is to avoid damaging the wood while still creating clean characters.
Cost-wise, engraving adds 1,100 yen. If you’re budgeting, I’d treat this as a “make it special” upgrade rather than an optional afterthought.
A nice benefit: engraving doesn’t just decorate. It gives your chopsticks a story you’ll remember every time you grab them.
What You’re Actually Paying For (Value, Not Just Price)
The base price is $25 per person for one hour. That sounds simple, but the value comes from what’s included beyond the tools themselves.
Your fee includes:
- The chopstick making workshop itself
- Tools and materials
- English-speaking staff support
- A guide fee of 1,000 yen included in the experience fee
- A starting set of wood choices (with 5 free wood types)
So you’re not just paying for a craft. You’re paying for coaching, equipment, materials, and a workflow that ends in a take-home finished pair.
Where costs can rise is in the wood selection and engraving:
- If you choose one of the higher-grade woods beyond the 5 free types, you’ll pay extra for that wood upgrade.
- If you add engraving, there’s an additional 1,100 yen charge.
My advice: decide early if you want upgrades. If you’re doing this as a souvenir, I think upgrading wood or adding engraving often feels worth it because that final finish is what you’ll notice most later.
Who This Workshop Fits Best in Your Tokyo Plan
This workshop is a good fit if you like doing things with your hands and you don’t mind learning by doing. It suits couples, friends, and families because it’s structured and guided, but still real woodworking.
The operator notes:
- Not suitable for children under 3
- Not suitable for people over 70
- Wheelchair accessible
From an experience standpoint, it’s also a great rainy-day option. You’re inside, it’s timed, and you leave with something you can actually use. And because it’s in Ginza, you can pair it with nearby meals and walking once you’re finished.
The one group that might struggle is anyone who hates hands-on effort or expects zero physical work. You’ll be planing and sanding by hand, and that takes grip strength and patience.
Practical Tips for a Smoother Hour
You’ll get the most satisfaction if you walk in prepared to slow down during the smoothing stages. Here are the small things that help most:
- Bring your best patience for sanding. Planing moves faster, but sanding is where comfort is earned.
- Expect to apply pressure for planing. If you feel like you’re forcing too much or too little, ask for help early rather than later.
- If you’re doing this with long hair, consider tying it back. Hand work gets sporty fast, and you’ll appreciate not having hair in the way.
- Choose your wood thoughtfully. If you want a specific look, upgrades might be the way to get it, but the free options are still part of the plan.
- If you want engraving, think about what you want etched before you sit down. Having the text ready makes the process quicker.
Should You Book Chopstick Making in Ginza?
Yes, I’d book it if you want a Tokyo souvenir that isn’t just a postcard. The workshop is short, hands-on, and guided, and you end with a useful item that still feels special months later.
It’s especially worth booking if you enjoy craftsmanship, want something personal through name engraving, or like the idea of picking your own wood and seeing the finish change once oil goes on.
But skip it if you expect a mostly passive activity or you’re hoping for something that takes almost no effort. This one rewards steady pressure, careful sanding, and a willingness to learn the tool motion.
FAQ
How long is the Chopstick Making Workshop in Ginza?
The workshop lasts 1 hour.
Where is the meeting point?
The meeting point is 2-9-13 Ginza, Chuo-ku, Tokyo.
What does the $25 price include?
The experience includes the chopstick making workshop, tools and materials, and English-speaking staff support. The guide fee of 1,000 yen is included.
Can I choose the type of wood and the chopstick length?
Yes. You can choose from 24 types of wood and two different lengths. Five wood types are free, and the rest are higher grade and may cost extra.
Is engraving available, and how much does it cost?
Yes. You can have your name engraved as an option for an additional 1,100 yen.
What languages can be used for engraving?
Your name or a favorite phrase can be engraved in Japanese or your native language.
Will I be able to take the chopsticks home the same day?
Yes. You can take your finished chopsticks home on the day.
Does the workshop have English-speaking staff?
Yes. Staff who can speak English assist you, and instruction is available in English and Japanese.
Is the workshop suitable for children or older adults?
It is not suitable for children under 3 years and people over 70 years.
Is the workshop wheelchair accessible?
Yes, it is listed as wheelchair accessible.
Is there flexibility for booking and payment?
You can reserve now and pay later. The experience also offers free cancellation up to 24 hours in advance for a full refund.