REVIEW · TOKYO
Tokyo: Origami Fun for Families & Beginners in Asakusa
Book on GetYourGuide →Operated by Taro's Origami Studio · Bookable on GetYourGuide
Origami time beats screen time in Tokyo. In Asakusa, you fold your way through 100+ models with tablet steps, in a calm studio that’s a nice break from the tourist buzz. I especially love choosing 50 colors of paper, and I also like how you can keep going at your own pace inside the 45 minutes.
I also like the small group setup, limited to just 6 people, with staff nearby to help if a step gets confusing. This is tablet-led rather than a classic lecture, so you stay focused on your paper and your hands.
One drawback to consider: it’s not a teacher-led lesson where someone constantly guides every fold. If you want a very interactive, story-heavy class, you may feel more help is available than you’ll get.
In This Review
- Key things to know before you go
- Asakusa origami: a calm break inside a busy neighborhood
- Finding Taro’s Origami Studio on Asakusa’s main street side
- 45 minutes and up to 6 people: what happens during your session
- How the tablet-guided folding actually works
- Choosing from 100+ models: how to pick smart for your first time
- The paper wall: 50 colors and a surprisingly fun decision
- Decorating your creations with stickers, stamps, and markers
- Photos, origami displays, and on-site shopping
- Staff help, not constant instruction: what that feels like in practice
- Who this is best for: families, beginners, and mixed skill groups
- Socks and the no-ramps reality: small logistics that matter
- Price and value: is $27 for 45 minutes worth it
- Practical tips to get the most from your session
- Should you book this Asakusa origami experience?
- FAQ
- FAQ
- How long is the origami session?
- Is this a teacher-led lesson?
- Do I need prior experience to fold origami?
- What do I need to bring?
- What age is this activity recommended for?
- Is food included?
- What languages are available for the session?
- Is the studio wheelchair accessible?
- What is included in the price?
Key things to know before you go
- Tablet instructions you can replay so you don’t panic when a fold goes sideways
- 50 paper colors + decor tools (stickers, stamps, markers) for quick personalization
- Small group size (up to 6) with staff support, not a one-on-one teacher walkthrough
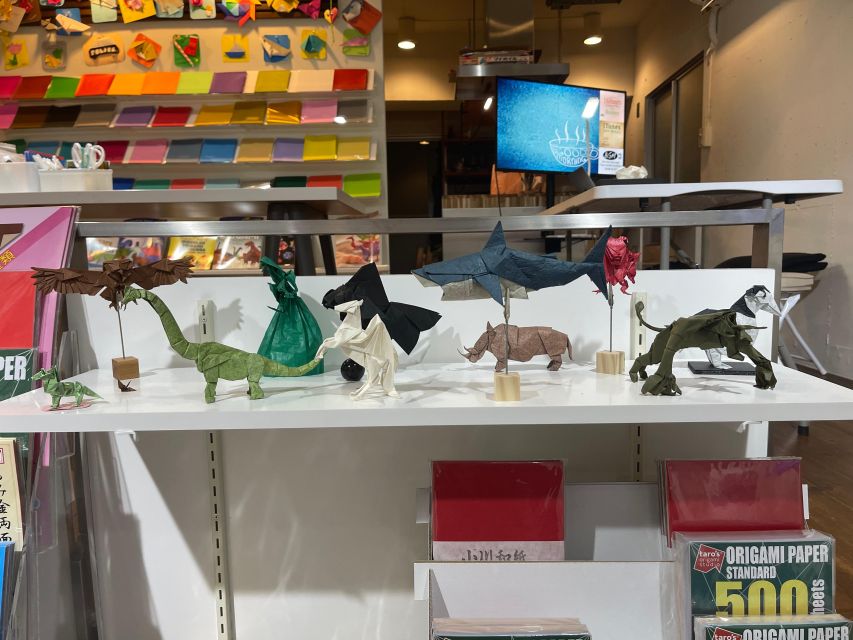
- Photos and shopping on-site plus origami displays to enjoy during and after
- Socks required for participation, and the studio uses stairs only
Asakusa origami: a calm break inside a busy neighborhood
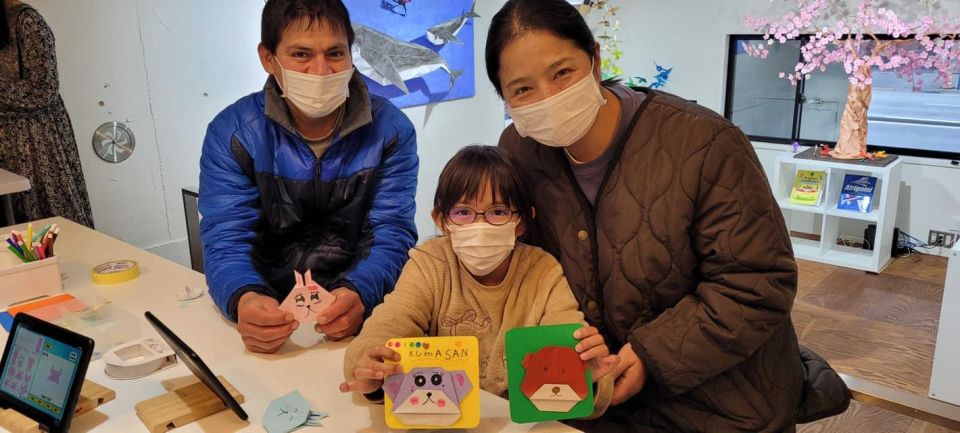
Asakusa can be sensory overload in the best way. This activity gives you something different: quiet, hands-on making while you’re still in the middle of one of Tokyo’s most popular areas.
The format is refreshingly practical. You pick a model on the tablet, choose a paper color from the wall, then follow step-by-step until you’ve created an assortment of animals, flowers, and vehicles.
That “make, not watch” feeling is a big part of the appeal for families and first-timers. Even if you’re brand-new to paper folding, you still get real results by the end.
You can also read our reviews of more tours and experiences in Tokyo.



Finding Taro’s Origami Studio on Asakusa’s main street side
This studio is all about getting in from the right side of the building. The entrance is on the main street side, so if you’re near the park you may be on the wrong side and you won’t be able to enter there.
Look for the company signage on the front of the building. There’s also a brown sea turtle affixed to the wall below the window, which is an easy visual clue when the street views start blending together.
If you’re arriving on foot, I’d treat this as a “slow your pace down” moment. In Japan, doors can be tucked in and it’s better to spot the markings than to wander the block twice.
45 minutes and up to 6 people: what happens during your session
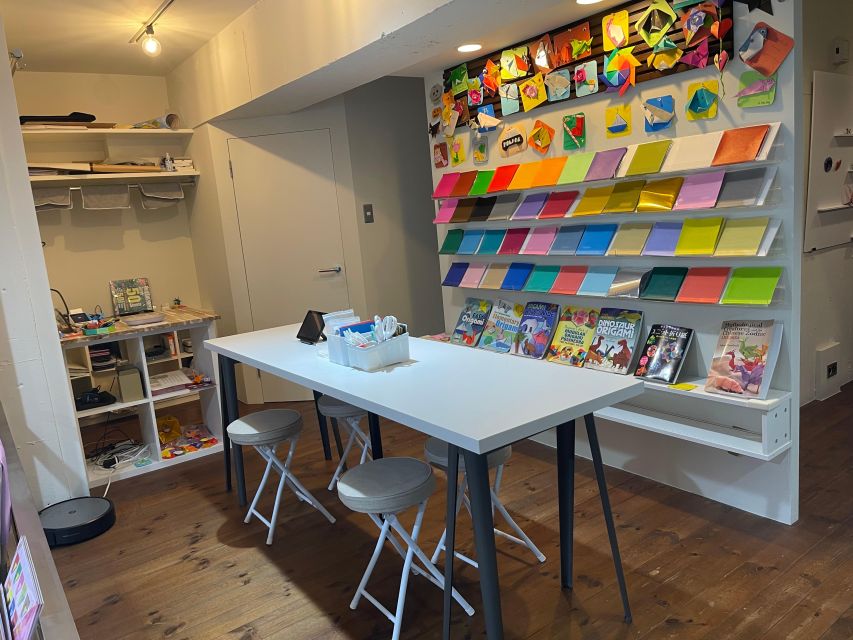
Your session runs 45 minutes, and you can usually fit it into a day of sightseeing without wrecking the schedule. Small groups keep things manageable, and you’ll be working at your own table rather than in a big workshop line.
Here’s the basic flow:
First, you choose your origami model categories on the tablet. Then you go to the paper wall to select your sheet color(s).
After that, you return to the tablet and press Play to start the folding steps. You can replay steps or go back through earlier parts if you need to reset a fold.
At a beginner-friendly pace, many people end up with multiple finished pieces. In one family-style experience, the group made about four items each in the allotted time, which gives you an idea of how the schedule tends to land.
How the tablet-guided folding actually works
This is a tablet-guided activity, not a teacher-led demonstration. That distinction matters, because you’re expected to follow the steps on-screen and rely on staff for help when you need it.
The tablet workflow is straightforward:
- Use the touchscreen menu on the PC tablet to pick your favorite model
- Walk to the paper wall and choose your color with the design in mind
- Return to the tablet and press Play
- Add your own decorations at the end with stickers, stamps, and markers
You’ll notice the activity covers models from beginner through intermediate difficulty. That’s useful if you’re traveling with kids or a mixed skill group, because everyone isn’t forced into the exact same level.
Staff are present to help participants, so you’re not left alone with a confusing step. Still, the structure is more self-guided than “follow the instructor’s hands” guided.
Choosing from 100+ models: how to pick smart for your first time
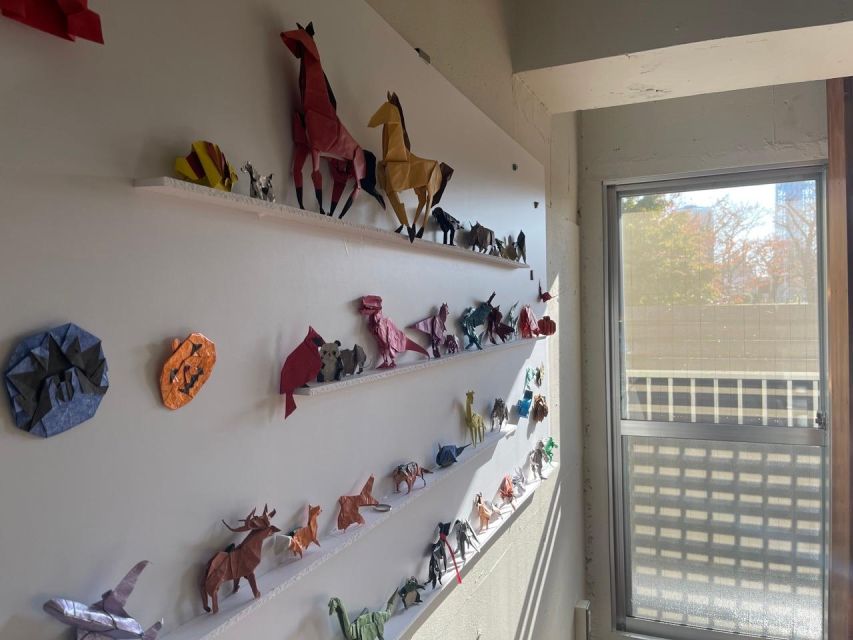
One of the best parts is sheer choice. With 100+ different models available, you’re not stuck folding only the simplest crane shape or only one theme.
For your first session, I’d pick models that match your tolerance for fiddly folds. Tablet options often range in difficulty, so if you’re doing this with kids, it’s smart to start with something that’s fun and quick to regain confidence.
If you’re an adult beginner, you might do one or two “easier wins” first, then graduate to something slightly more detailed. The 45 minutes reward momentum, and nothing kills momentum like getting stuck on a complex piece too early.
Also, animals and flowers are popular picks for a reason. They tend to produce satisfying shapes that look good even when your folds aren’t perfect.





The paper wall: 50 colors and a surprisingly fun decision
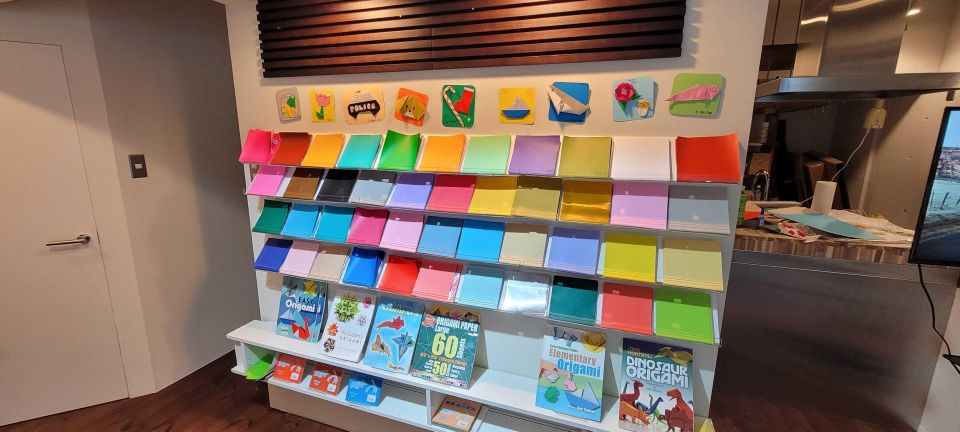
Choosing paper color sounds minor, but it changes the whole vibe of your finished pieces. With 50 colors available, you can tailor your creations to a theme—pastels for flowers, bold colors for vehicles, or patterned color choices if your model benefits from contrast.
A practical tip: match the paper color to the model. The studio specifically recommends thinking about the design as you choose your sheet(s), which helps prevent that moment where you realize a dark paper doesn’t suit a delicate flower.
Paper color also affects your decorating later. Stickers and stamps pop more against certain shades, so it’s worth making that decision early rather than treating it like an afterthought.
Decorating your creations with stickers, stamps, and markers
Once you’ve finished the folding steps, you can personalize the result. The tablet process includes prompts for choosing stickers, stamps, and markers, which makes the last part feel creative instead of technical.
This is where kids often shine. Even if their folds aren’t perfectly symmetrical, the decorations make the end product feel like theirs.
It also helps adults, because it turns your project into a small souvenir you’re proud to carry. You’re not just leaving with paper cranes; you’re leaving with a set of folded, decorated mini artworks.
Photos, origami displays, and on-site shopping
You’re allowed to take photos throughout your experience. If you’re doing this as a family activity, that matters more than it seems, since you’ll want to capture the finished pieces and the different colors.
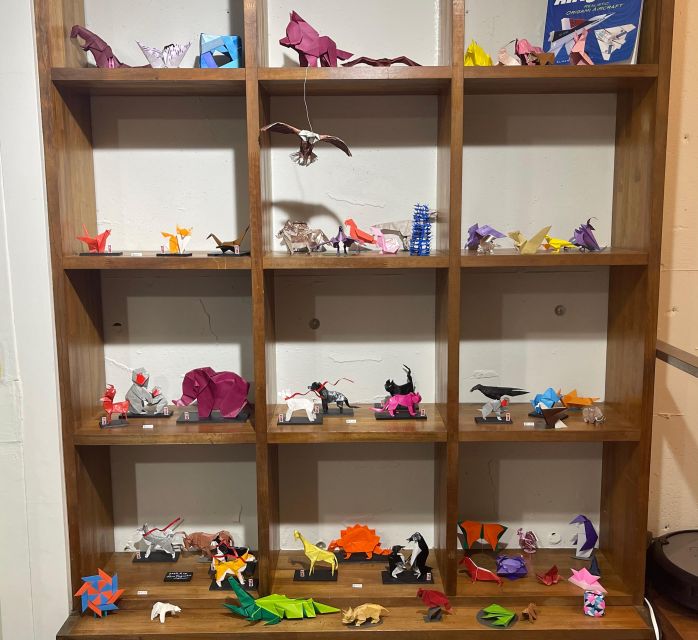
There are also origami displays to enjoy during and after your session. That’s a good reset between folds or a nice way to get inspired if you want to try a different model next.
The studio experience also includes time to make purchases if you want to. If you’re the kind of traveler who collects small handmade things, this is one of the more satisfying ways to do it in Tokyo without turning it into clutter.
Staff help, not constant instruction: what that feels like in practice
Because this isn’t a private teacher-led lesson, staff support works like “assist when needed.” The staff member(s) are there to help participants with their origami models, but you’re still following the tablet steps as your main guide.
That approach tends to work well for beginners who like structure. It also works for families where adults want to enjoy the process rather than constantly translate a teacher’s explanation.
In practice, getting help at the right moment can save time. One experience described an instructor helping even create something like a rose for a son, which shows the staff can go beyond basic correction when appropriate.
You might also find the guidance style is supportive rather than intrusive. Some sessions emphasize that the helper has an eye on your work but doesn’t hover and take over, which is often exactly what you want.
Who this is best for: families, beginners, and mixed skill groups
This activity is designed for beginners. The tablet steps and choice of models make it accessible even if you’ve never folded origami before.
It’s also family-friendly on paper, with a recommended minimum age of four. Kids under five who cannot fold independently need adult supervision throughout the activity.
For older kids, there’s a clear rule: kids under 13 need adult supervision throughout. That means you’ll want to go as a family unit with a plan for who helps when the folds get tricky.
Group size helps here too. With limited seating and a small group, there’s less chaos than in big attractions, and you can keep an eye on your child’s progress.
There’s also a caution for health: it’s not suitable for people with a cold. If you’re traveling during cold season, it’s worth planning around that.
Socks and the no-ramps reality: small logistics that matter
Socks are required for participation. You’ll need to bring socks to the studio, and if you forget, you can purchase a pair beforehand, but it’s still an extra step you can avoid.
This studio is not handicap accessible. There are stairs and no ramps or lifts, and seating does not have back support.
If you or someone in your group has mobility concerns or needs a more comfortable seated setup, this matters. I’d check your family’s physical needs before booking so the activity stays relaxing instead of frustrating.
Also, the studio is set up so children can fold at their own tables, which is great for focus. It’s just not designed as a cushy, linger-for-hours lounge.
Price and value: is $27 for 45 minutes worth it
At $27 per person for 45 minutes, you’re paying for a guided making experience, not just paper. You’re also covering the tablet system, the studio supplies, and the “hands-on structure” that helps beginners succeed.
Here’s why it can be good value:
You’re not paying only for the materials. You’re paying for the workflow—model selection, step instructions, and the ability to replay steps—plus staff support when needed.
You also leave with multiple finished pieces. With enough time to fold more than one model (and add decorations), the experience feels like you got something tangible out of your Tokyo day, not just a quick novelty.
That said, it’s not a long, multi-lesson workshop. If you want a slow, deeply taught origami class with lots of verbal instruction, this time window may feel short.
For most first-timers and families, though, 45 minutes is a sweet spot. It’s long enough to feel productive and short enough to fit into a busy sightseeing plan.
Practical tips to get the most from your session
Plan your model choices quickly. The tablet has menus and categories, and you’ll waste less time if you decide early what you want to fold first.
Start simple if you’re new. You can always switch models, and building a quick win early makes the second piece feel easier.
If you’re traveling with kids, agree on a seating and supervision plan. With the rule that kids under 13 need adult supervision, it helps if you take turns but stay attentive to each step.
Bring socks. It sounds obvious, but it’s the kind of small detail that can derail your schedule if you realize it at the door.
Finally, use the replay button if something feels off. Origami isn’t one clean motion; it’s layered. Replaying a step isn’t failure; it’s smart technique.
Should you book this Asakusa origami experience?
Book it if you want an easy, structured way to try origami for the first time in Tokyo. It’s especially worth it for families, because the format supports beginners and still offers a satisfying challenge through intermediate options.
I’d also recommend it if you like calm activities with tangible results. You’ll leave with decorated folded pieces, photos to remember the process, and a chance to enjoy the studio’s displays too.
Skip it (or consider a different option) if you need a fully teacher-led, hands-on lecture-style class. The tablet is the “main voice,” and staff support is there, but it isn’t constant instruction at every step.
FAQ
FAQ
How long is the origami session?
The activity lasts 45 minutes.
Is this a teacher-led lesson?
No. It’s a tablet-guided activity. Staff members are present to help, but it is not a teacher-led class.
Do I need prior experience to fold origami?
No. It’s accessible to beginners, with models ranging from beginner to intermediate difficulty.
What do I need to bring?
You need to bring socks. Socks must be worn to participate, and you can purchase a pair beforehand if needed.
What age is this activity recommended for?
It’s recommended for children four and older. Kids under five who cannot fold independently require adult supervision throughout.
Is food included?
No. Food and drinks are not included.
What languages are available for the session?
Instruction is available in English and Japanese.
Is the studio wheelchair accessible?
No. The facility is not handicap accessible, with stairs and no ramps or lifts, and seating does not have back support.
What is included in the price?
Origami paper and supplies, instruction, and taxes and fees are included.